tmux is a terminal multiplexer. It lets you run multiple terminal sessions inside a single window, detach from them without killing processes, and reattach later from any machine. You control it with a prefix key (Ctrl+b by default) followed by a command key. It runs on Linux and macOS, requires no GUI, and is especially useful for remote SSH work, long-running processes, and AI coding workflows where session persistence matters.
If you have ever had an SSH connection drop and kill a running process, you already know the problem tmux solves. If you have ever juggled six terminal tabs and lost track of which one was running what, same thing. Five minutes of learning saves you hours of frustration.
I use tmux daily for development work, mainly for session persistence when working with AI coding agents. This cheat sheet starts with the four commands that cover 90% of daily usage, then gives you a comprehensive reference for everything else. Bookmark it. You will come back to it.
The current stable version is tmux 3.6a, maintained by Nicholas Marriott and contributors. It has roughly 42,000 GitHub stars and about 46,000 Homebrew installs in the past 30 days.
The Four Commands You Actually Need
Most tmux tutorials throw 50 commands at you upfront. In practice, you really only need four to get started:
| Command | What It Does |
|---|---|
tmux new -s name | Create a new named session |
tmux attach -t name | Reattach to an existing session |
tmux kill-session -t name | Kill a session when you are done |
tmux ls | List all running sessions |
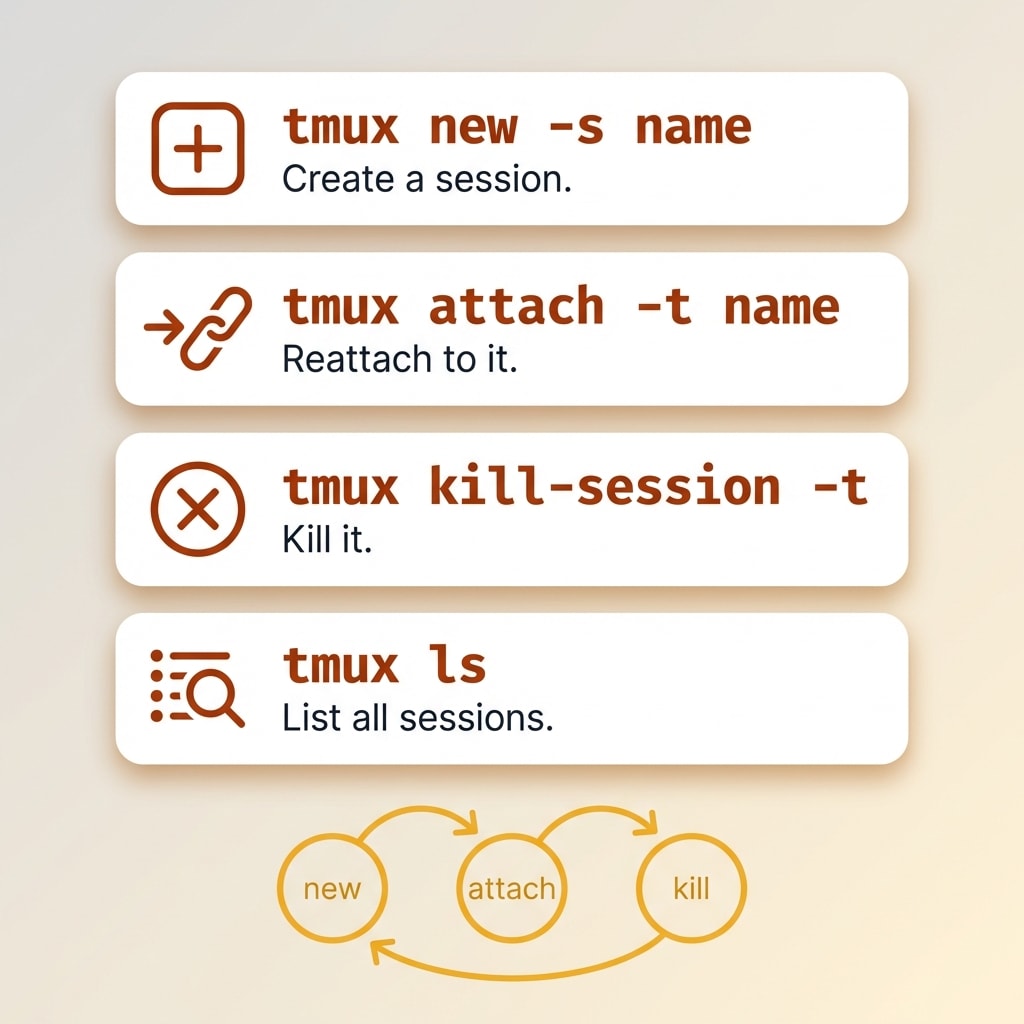
That is it. Create a session, reattach to it later, kill it when you are done. Use tmux ls when you forget what you have running. Everything else in this cheat sheet is reference material for when you need it.
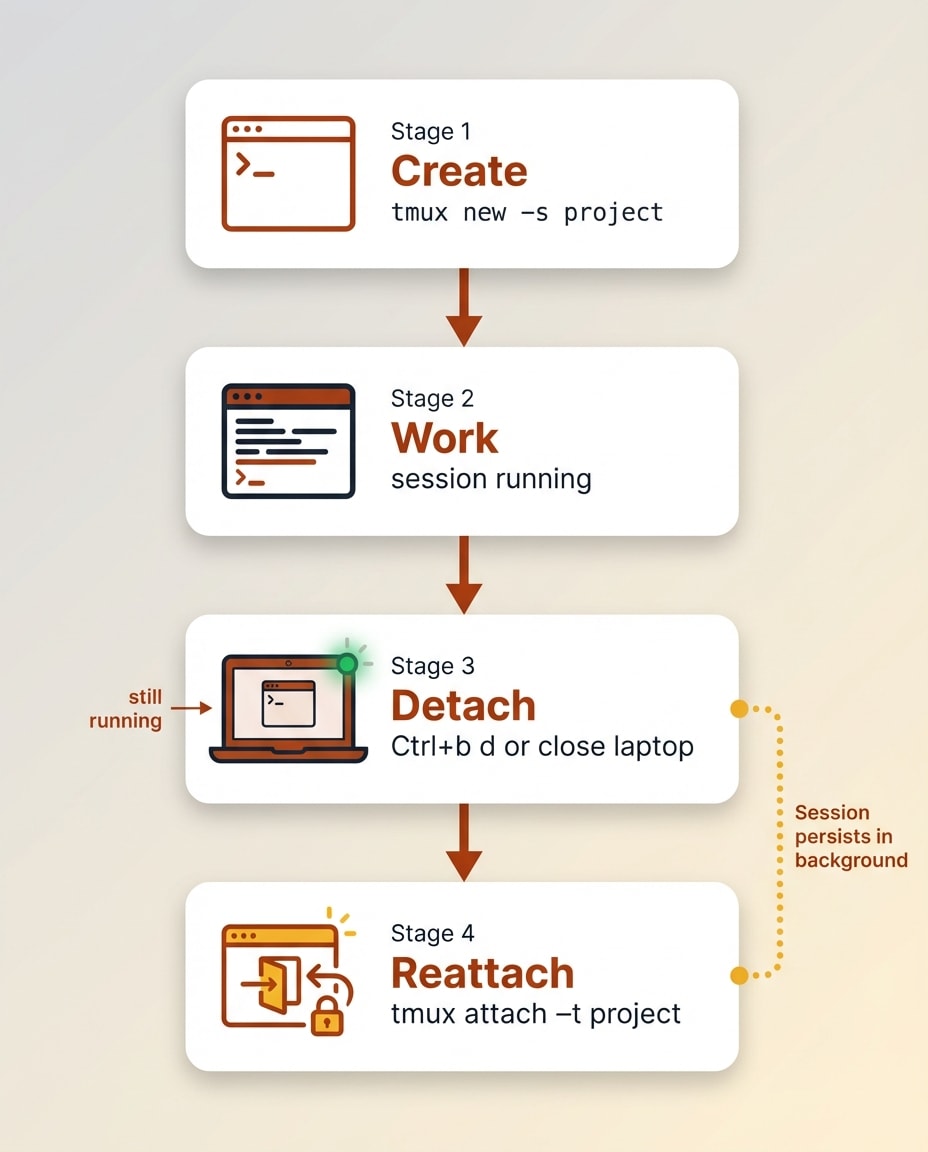
Here is a typical workflow: you start your day with tmux new -s myproject, do your work, close your laptop, and the session keeps running. When you come back, tmux ls reminds you what sessions are active, then tmux attach -t myproject picks up exactly where you left off. When the project wraps up, tmux kill-session -t myproject cleans it up.
I use Typinator, a text expansion app for Mac, to shortcut these commands:
tmuxa→tmux attach -ttmuxn→tmux new -stmuxk→tmux kill-session -t
If you already have a text expansion tool installed, setting up a few tmux abbreviations removes the friction of remembering exact syntax.
Once those four commands are muscle memory, the rest of this cheat sheet becomes a reference you can dip into as needed.
tmux for AI Coding Workflows
tmux has become essential for developers using terminal-based AI coding agents. If you are using tools like Claude Code, tmux solves several problems that standard terminals cannot.
Session persistence for AI agents. Claude Code sessions can run for extended periods. If your terminal crashes or you close your laptop, a tmux session keeps the agent running. You reattach and continue the conversation without losing context.
Multi-pane workflows. A typical setup is three panes: your code editor in one, an AI agent in another, and a test runner in the third. You see everything at once without switching tabs. This is the tmux split screen workflow that makes terminal-based AI development practical.
Named sessions per project. Run tmux new -s projectname for each codebase. Switching between projects is instant. Each session has its own layout and running processes.
Agent teams in parallel panes. Claude Code supports running multiple AI instances simultaneously. The official docs specifically state that you need a terminal multiplexer so each teammate gets its own visible pane. VS Code's integrated terminal does not support the split-pane mode needed for this. You need tmux or iTerm2.
External sessions that Claude Code can access. This is the one that most people miss. Claude Code can run bash commands from within its own session, which means it can start a dev server and monitor the output directly. That is useful, but there is a catch: if you shut down Claude Code, that bash session dies with it. The server, the logs, everything inside Claude's process goes away.
tmux solves this. You can have Claude Code dial into a running tmux session instead. The session lives outside of Claude's own infrastructure, so it persists regardless of what happens to the Claude Code process. You cannot point Claude at a regular terminal window and say "look at that." But you can point it at a named tmux session. That is a key reason tmux matters for AI coding workflows.
One important note for tmux users working with Claude Code: tmux uses Ctrl+b as its prefix key, and Claude Code also uses Ctrl+b as a keybinding. You need to press Ctrl+b twice to send it through to Claude Code. Alternatively, remap your tmux prefix to Ctrl+a using the starter config further down this page.
And here is the ironic part: you can use Claude Code itself to configure tmux. If you are struggling with scroll speed, copy/paste behavior, or any of the other configuration quirks (and there will be quirks, tmux has been around since 2007), just ask Claude to fix your tmux.conf. It is good at it.
For a deeper look at how Claude Code works across different editors and why the terminal is the most powerful surface, see the Claude Code IDE setup guide. And if you want the full breakdown of how terminal-first development changes your editor choice, I covered that in my AI code editor comparison.
tmux Sessions
Sessions are the core organizational unit in tmux. Each session is an independent workspace with its own set of windows and panes. When you detach from a session, everything inside it keeps running. When you reattach, you pick up exactly where you left off.
Think of sessions as separate desks. You might have one session for a web project, another for a backend service, and a third for documentation work. Switching between them takes less than a second.
Starting and Naming Sessions
Start with a named session whenever possible. It makes reattaching and organizing much easier.
| Command | Action |
|---|---|
tmux | Start a new unnamed session |
tmux new | Start a new unnamed session |
tmux new -s name | Start a new session named "name" |
tmux new-session -A -s name | Attach to "name" if it exists, otherwise create it |
The -A flag on new-session is one of the most useful options in tmux. It means you can always run the same command without worrying about whether the session already exists. It either creates the session or attaches to it if it is already running.
Attaching and Detaching
Detaching is what makes tmux powerful. You disconnect from a session and it keeps running. Processes, output, scroll history. All preserved.
| Command / Shortcut | Action |
|---|---|
tmux a | Attach to last session |
tmux attach | Attach to last session |
tmux attach -t name | Attach to session named "name" |
tmux ls | List all active sessions |
Ctrl+b d | Detach from current session |
Ctrl+b s | List sessions interactively |
When you have multiple sessions running, tmux ls gives you a quick overview. The interactive session list (Ctrl+b s) is even better because it shows a preview of each session and lets you switch between them with arrow keys.
Killing Sessions
Sometimes you need to clean up. These commands shut down sessions and their processes.
| Command | Action |
|---|---|
tmux kill-session -t name | Kill a specific session |
tmux kill-session -a | Kill all sessions except the current one |
tmux kill-session -a -t name | Kill all sessions except "name" |
tmux kill-server | Kill the tmux server and all sessions |
Use kill-server with caution. It destroys every session, window, and pane across all tmux instances. There is no undo.
Session Key Bindings
These shortcuts work from inside a tmux session. Remember, all key bindings start with the prefix key (Ctrl+b by default), followed by the command key.
| Shortcut | Action |
|---|---|
Ctrl+b $ | Rename current session |
Ctrl+b ( | Switch to previous session |
Ctrl+b ) | Switch to next session |
Ctrl+b w | Preview all sessions and windows |
Ctrl+b s | List all sessions |
The Ctrl+b w shortcut deserves special mention. It opens a tree view of all sessions and their windows. You can navigate with arrow keys and press Enter to jump to any window in any session. It is the fastest way to move around a complex tmux setup.
tmux Windows
Windows in tmux work like tabs in a browser. Each session can contain multiple windows, and each window fills the entire terminal screen. You see one window at a time, with a status bar at the bottom showing all your windows.
Use windows to separate different tasks within a project. For example, one window for your editor, one for running a dev server, one for git operations.
| Shortcut / Command | Action |
|---|---|
Ctrl+b c | Create a new window |
Ctrl+b , | Rename current window |
Ctrl+b & | Close current window (with confirmation) |
Ctrl+b n | Switch to next window |
Ctrl+b p | Switch to previous window |
Ctrl+b 0-9 | Switch to window by number |
Ctrl+b w | List all windows across sessions |
Ctrl+b l | Switch to last active window |
Ctrl+b f | Find window by name |
swap-window -s 2 -t 1 | Swap window 2 and window 1 |
move-window -r | Renumber all windows sequentially |
Windows versus panes is a common source of confusion for beginners. The simple rule: use windows when you want to see one thing at a time (like switching between apps), and use panes when you want to see multiple things simultaneously (like a split screen). Most workflows use both. A common setup is keeping your editor and AI agent in panes within one window, and using separate windows for tasks like monitoring logs or running tests.
tmux Panes
Panes let you split a single window into multiple visible sections. This is the tmux split screen feature that most people learn first. You can split vertically, horizontally, and keep splitting to create complex layouts.
Splitting and Navigating
| Shortcut | Action |
|---|---|
Ctrl+b % | Split pane vertically (left/right) |
Ctrl+b " | Split pane horizontally (top/bottom) |
Ctrl+b Arrow Keys | Move to pane in that direction |
Ctrl+b o | Cycle to next pane |
Ctrl+b ; | Toggle to last active pane |
Ctrl+b q | Show pane numbers (press number to jump) |
The default split keys (% and ") are not intuitive. Most people remap them. The starter config below maps | for vertical splits and - for horizontal splits. That is much easier to remember.
Ctrl+b q is underrated. It briefly flashes a number on each pane, and if you press that number quickly, you jump straight to it. Very useful when you have four or more panes open.
Want to Hear From Me Weekly?
I'm putting together a weekly email with the real stuff. What's working, what's not, and the tools I'm actually using to grow. Not live yet, but you can grab a spot. Totally free!
Resizing and Rearranging
| Shortcut / Command | Action |
|---|---|
Ctrl+b { | Move current pane left |
Ctrl+b } | Move current pane right |
Ctrl+b Space | Cycle through pane layouts |
Ctrl+b z | Zoom pane (toggle fullscreen) |
Ctrl+b ! | Convert pane to its own window |
:resize-pane -D 20 | Resize pane down by 20 cells |
:resize-pane -U 20 | Resize pane up by 20 cells |
:resize-pane -L 20 | Resize pane left by 20 cells |
:resize-pane -R 20 | Resize pane right by 20 cells |
The zoom feature (Ctrl+b z) is worth knowing. It expands the current pane to fill the whole window. Press it again to return to the split layout. This lets you quickly focus on one pane without losing your layout.
Ctrl+b Space cycles through predefined layouts: even-horizontal, even-vertical, main-horizontal, main-vertical, and tiled. Instead of manually resizing each pane, just cycle until you find a layout that works.
Synchronize Panes
tmux can send the same keystrokes to all panes in a window simultaneously. Turn it on with:
:setw synchronize-panes
Run it again to toggle off. This is incredibly useful when you need to run the same command on multiple servers. Open a pane for each server, SSH into each one, enable synchronize-panes, and type once. Every pane receives the same input.
tmux Copy Mode
Copy mode lets you scroll through output, search for text, and copy content without a mouse. By default, tmux uses emacs-style key bindings in copy mode. If you prefer vi-style keys (which most developers do), add setw -g mode-keys vi to your config.
The tables below use vi-mode bindings.
Navigation and Selection
| Key | Action |
|---|---|
Ctrl+b [ | Enter copy mode |
q | Quit copy mode |
h / j / k / l | Move left / down / up / right |
w | Move forward one word |
b | Move backward one word |
g | Jump to top of buffer |
G | Jump to bottom of buffer |
/ | Search forward |
? | Search backward |
n | Next search match |
N | Previous search match |
Space | Start selection |
Enter | Copy selection and exit copy mode |
Esc | Clear selection |
Buffer Commands
These commands are run from the tmux command prompt (accessed with Ctrl+b :).
| Command | Action |
|---|---|
Ctrl+b ] | Paste from buffer |
:show-buffer | Display buffer contents |
:list-buffers | List all paste buffers |
:choose-buffer | Interactively select a buffer to paste |
:save-buffer file.txt | Save buffer contents to a file |
:capture-pane | Capture visible pane content to buffer |
tmux 3.4 added the copy-command option, which lets you pipe copied text directly to your system clipboard. Combined with tmux-yank (covered in the plugins section), this makes clipboard integration seamless. tmux 3.5 added hyperlink display in copy mode, so clickable URLs in terminal output remain visible when you scroll through history.
tmux Configuration
The tmux.conf File
tmux reads its configuration from ~/.tmux.conf on startup. If you want a system-wide config, use /etc/tmux.conf. User-level config overrides system-level settings.
After editing your config, you have two options. Either restart tmux (close all sessions and start fresh) or reload the config from inside tmux:
tmux source-file ~/.tmux.conf
Or, if you include the reload binding from the starter config below, just press Ctrl+b r (or Ctrl+a r if you remap the prefix).
Starter Configuration
Here is a practical starter config. Every line is commented so you know what it does and why.
# Remap prefix to Ctrl+a (keep Ctrl+b as secondary)
unbind C-b
set -g prefix C-a
bind C-a send-prefix
set -g prefix2 C-b

# Terminal + colours
set -g default-terminal "screen-256color"
set -as terminal-features ",*:RGB"

# Scrollback / history
set -g history-limit 50000

# Mouse support (scrolling, pane selection, window selection)
set -g mouse on

# Copy mode / keys (vi mode)
setw -g mode-keys vi
set -g status-keys vi

# Quality-of-life: reduce escape delay (tmux 3.6 defaults to 10ms)
set -sg escape-time 10

# Reload config quickly
bind r source-file ~/.tmux.conf \; display-message "Reloaded ~/.tmux.conf"

# Start windows and panes at 1, not 0
set -g base-index 1
setw -g pane-base-index 1

# Easier splits (| for vertical, - for horizontal)
bind | split-window -h
bind - split-window -v
A few notes on this config. The escape-time setting matters if you use vim or neovim inside tmux. A high escape time creates a noticeable delay when pressing Escape. tmux 3.6 reduced the default to 10ms, but older versions default to 500ms. Setting it explicitly ensures consistent behavior.
The terminal-features line enables true color support in modern terminals. Without it, you might get washed-out colors in editors running inside tmux.
Mouse support is controversial among terminal purists, but it is practical. It lets you click on panes to select them, scroll with your trackpad, and resize panes by dragging borders. You can always hold Shift to bypass tmux and use native terminal selection when needed.
tmux Plugins
tmux has a plugin ecosystem managed through TPM (tmux Plugin Manager), which has roughly 14,000 GitHub stars. Plugins are optional. tmux works fine without them, and many developers stick with a plain tmux.conf. But if you want extended functionality, here is how the plugin system works and what is popular.
Installing TPM
git clone https://github.com/tmux-plugins/tpm ~/.tmux/plugins/tpm
Then add plugin declarations to the bottom of your ~/.tmux.conf:
# Plugin declarations
set -g @plugin 'tmux-plugins/tpm'
set -g @plugin 'tmux-plugins/tmux-sensible'
set -g @plugin 'tmux-plugins/tmux-resurrect'
set -g @plugin 'tmux-plugins/tmux-yank'

# Initialize TPM (keep this at the very bottom)
run '~/.tmux/plugins/tpm/tpm'
Press Ctrl+b I (capital I) to install plugins after adding them.
Something New Is Coming...
A weekly breakdown of what's working across SaaS, ecommerce, and online marketing. The kind of stuff I'd tell a friend. Not launched yet, but you can grab a spot. Totally free!
Popular Plugins
| Plugin | Stars | What It Does |
|---|---|---|
| tmux-sensible | ~2,100 | Sensible default settings that most users agree on |
| tmux-resurrect | ~12,500 | Save and restore tmux sessions across reboots |
| tmux-continuum | ~3,800 | Automatic session saving (pairs with resurrect) |
| tmux-yank | ~3,000 | System clipboard integration for copy mode |
tmux-resurrect is the most notable. Without it, rebooting your machine means rebuilding every session, window, and pane layout from scratch. With it, Ctrl+b Ctrl+s saves and Ctrl+b Ctrl+r restores. It saves pane layouts, working directories, and even running programs. Combined with tmux-continuum for automatic saving, sessions can survive reboots.
Frequently Asked Questions
What is tmux?
tmux is a terminal multiplexer that lets you run multiple terminal sessions inside a single window. It organizes your work into sessions, windows, and panes. You can detach from a session and reattach later, even from a different machine. Your processes keep running in the background while you are disconnected.
What is the default tmux prefix key?
The default tmux prefix key is Ctrl+b. You press Ctrl+b first, release it, then press the command key. Many users remap the prefix to Ctrl+a for easier reach, since the "a" key is on the home row. You can set both as active prefixes in your tmux.conf so either one works.
How do I split the screen in tmux?
Press Ctrl+b % to split vertically, creating a left and right pane. Press Ctrl+b " to split horizontally, creating a top and bottom pane. You can split panes further to create complex layouts. Use Ctrl+b followed by arrow keys to move between panes.
How do I copy and paste in tmux?
Press Ctrl+b [ to enter copy mode. Navigate with vi keys (if enabled) or arrow keys. Press Space to start selecting text, then Enter to copy the selection. Press Ctrl+b ] to paste. Enable vi mode in your config with setw -g mode-keys vi for the best copy mode experience.
What is the difference between tmux and screen?
tmux has better pane management, a more active development community, and a plugin ecosystem through TPM. GNU Screen is still maintained (version 5.0.1 released May 2025) and excels at serial console access and its multiuser ACL model. tmux is the more modern choice for most developers, with roughly 42,000 GitHub stars and frequent releases. Screen remains a solid tool for specific use cases like shared terminal sessions and serial device access.
How do I detach from a tmux session?
Press Ctrl+b d to detach from the current session. The session keeps running in the background with all processes intact. You can reattach later with tmux attach or the shorthand tmux a. To attach to a specific named session, use tmux attach -t session-name.
How do I install tmux?
On macOS, run brew install tmux (macOS does not ship with tmux pre-installed). On Ubuntu or Debian, use sudo apt install tmux. On Fedora or RHEL, use sudo dnf install tmux. On Arch Linux, use pacman -S tmux. On Alpine Linux, use apk add tmux. For Windows, install WSL first, then use your Linux distribution's package manager.
Conclusion
tmux gives you three things that matter for serious terminal work: session persistence so processes survive disconnects, multi-pane layouts so you can see everything at once, and process isolation so one crashed command does not take down your entire workspace.
The learning curve is shorter than it looks. Learn the four core commands (tmux new -s, tmux attach -t, tmux kill-session -t, tmux ls) and you have already covered most of daily usage. Everything else in this cheat sheet is here for when you need it.
For modern development workflows, especially those built around terminal-based AI agents, tmux is not optional. It is the foundation. Session management, parallel panes, and detach-reattach capability make it the tool that holds everything together.
Start with the four commands and the starter config above. Build from there as you need more.
